Design, Education, Preliminary Design Stage Series

Episode 9: Design Concept

A concept is an abstract idea or invention used to help portray or sell an idea, opinion, theory or conviction. Pretty much like having a theme for a party, the decorations, food, setting and costumes all fall in line with the theme. In architecture, we use concepts as an approach to a design, an abstract that we base a design through its process. When we think of architectural concepts, we think of an abstract idea, one that is unchanging throughout the design process. This is not necessarily the case, a concept can be linked to many factors, and can evolve as the design grows. Architectural concepts are the designers way of responding to the design situation presented to them. They are a means of translating the non-physical design problem into the physical building product. Every project will have critical issues, central themes or problem essences, and the general issues of designing a building can be approached in a number of ways.

The following is a broad category of the approaches used for concepts in architecture:

Functional Approach

This approach normally goes with the famous saying “form follows function” which simply means the form or shape of the building is achieved through the level of functionality of the building. It is considered when the project at hand needs a more functional element rather than an aesthetic one. For example, in the design of a factory or a hospital, where the functionality of the spaces is at the forefront of the design, a functional approach is best suited for the design concept. This approach does not mean that the design must lack aesthetic properties, but it may just be that the function of the building is the key focus.

Material Approach

Choice of materials is an early part of design, and it can also be an approach for a design concept. By focusing on a specific material, we will be naturally led towards particular forms of construction, therefore creating a type of appearance organically. This approach gives room for innovation as selection of local materials gives the public a sense of comfort and familiarity and flows with the natural surrounding. For example, a museum in Kano, Nigeria, can be constructed with sun bricks which is a local building material in the area, which will impact and attract the visitors of the museum.

Gidan Makama Museum, Kano, Nigeria designed with locally sourced materials (Source: Daily Trust)

Contextual Approach

This approach usually looks at the context of the site and surroundings, the historical features of the area, the people that occupy the area. This approach is heavily drawn from site analysis, exploring the data collected about the site, which may be physical and non-physical data. This does not always mean that a design must fit into the context of its surroundings, but some designers tend to create a contrast between the old and the new. For example, a house to be built within a rocky area, may tend to have stone finishing, an edgy design etc., while on the opposite hand, a modern house designed within the midst of old classical houses.

Michael Lee-Chin Crystal, an addition to the Royal Ontario Museum, Toronto designed by Daniel Libeskind (Source: Architectural Digest)

Conceptual Approach

This approach deals with designs that are based of a concept or an idea. This is the most common concept known to students, as they base their designs on certain abstract ideas which may be an object or an item. Conceptual architecture is sometimes never built, but rather designed as a form of thought provocation, exploration of ideas. An example of this approach is the Burj Al-Arab in Dubai where the concept originated from a sail.

Burj Al-Arab, Dubai (Source: Pexels)

Philosophical Approach

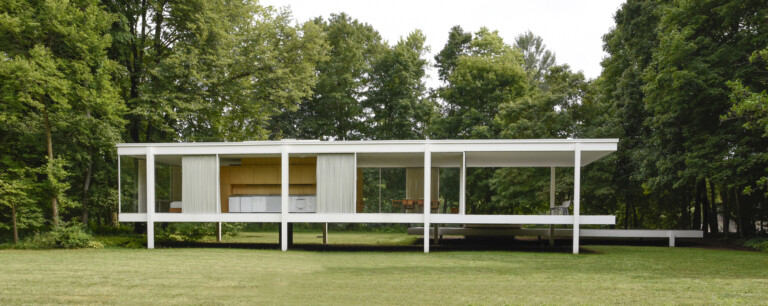
Another approach to architectural concepts is to consider your design philosophy. This is a set of values you use to inform your design. The values could be the life values of the designer, or could be a reflection of the design brief or context of the site, or indeed a combination of all three. A good example of an architect that uses this approach is Ludwig Mies van der Rohe, who is famous for his saying “less is more”. He emphasized on simplicity and often used steel and glass as building materials.

Fransworth House by Ludwig Mies van der Rohe (Source: fransworthhouse.org)

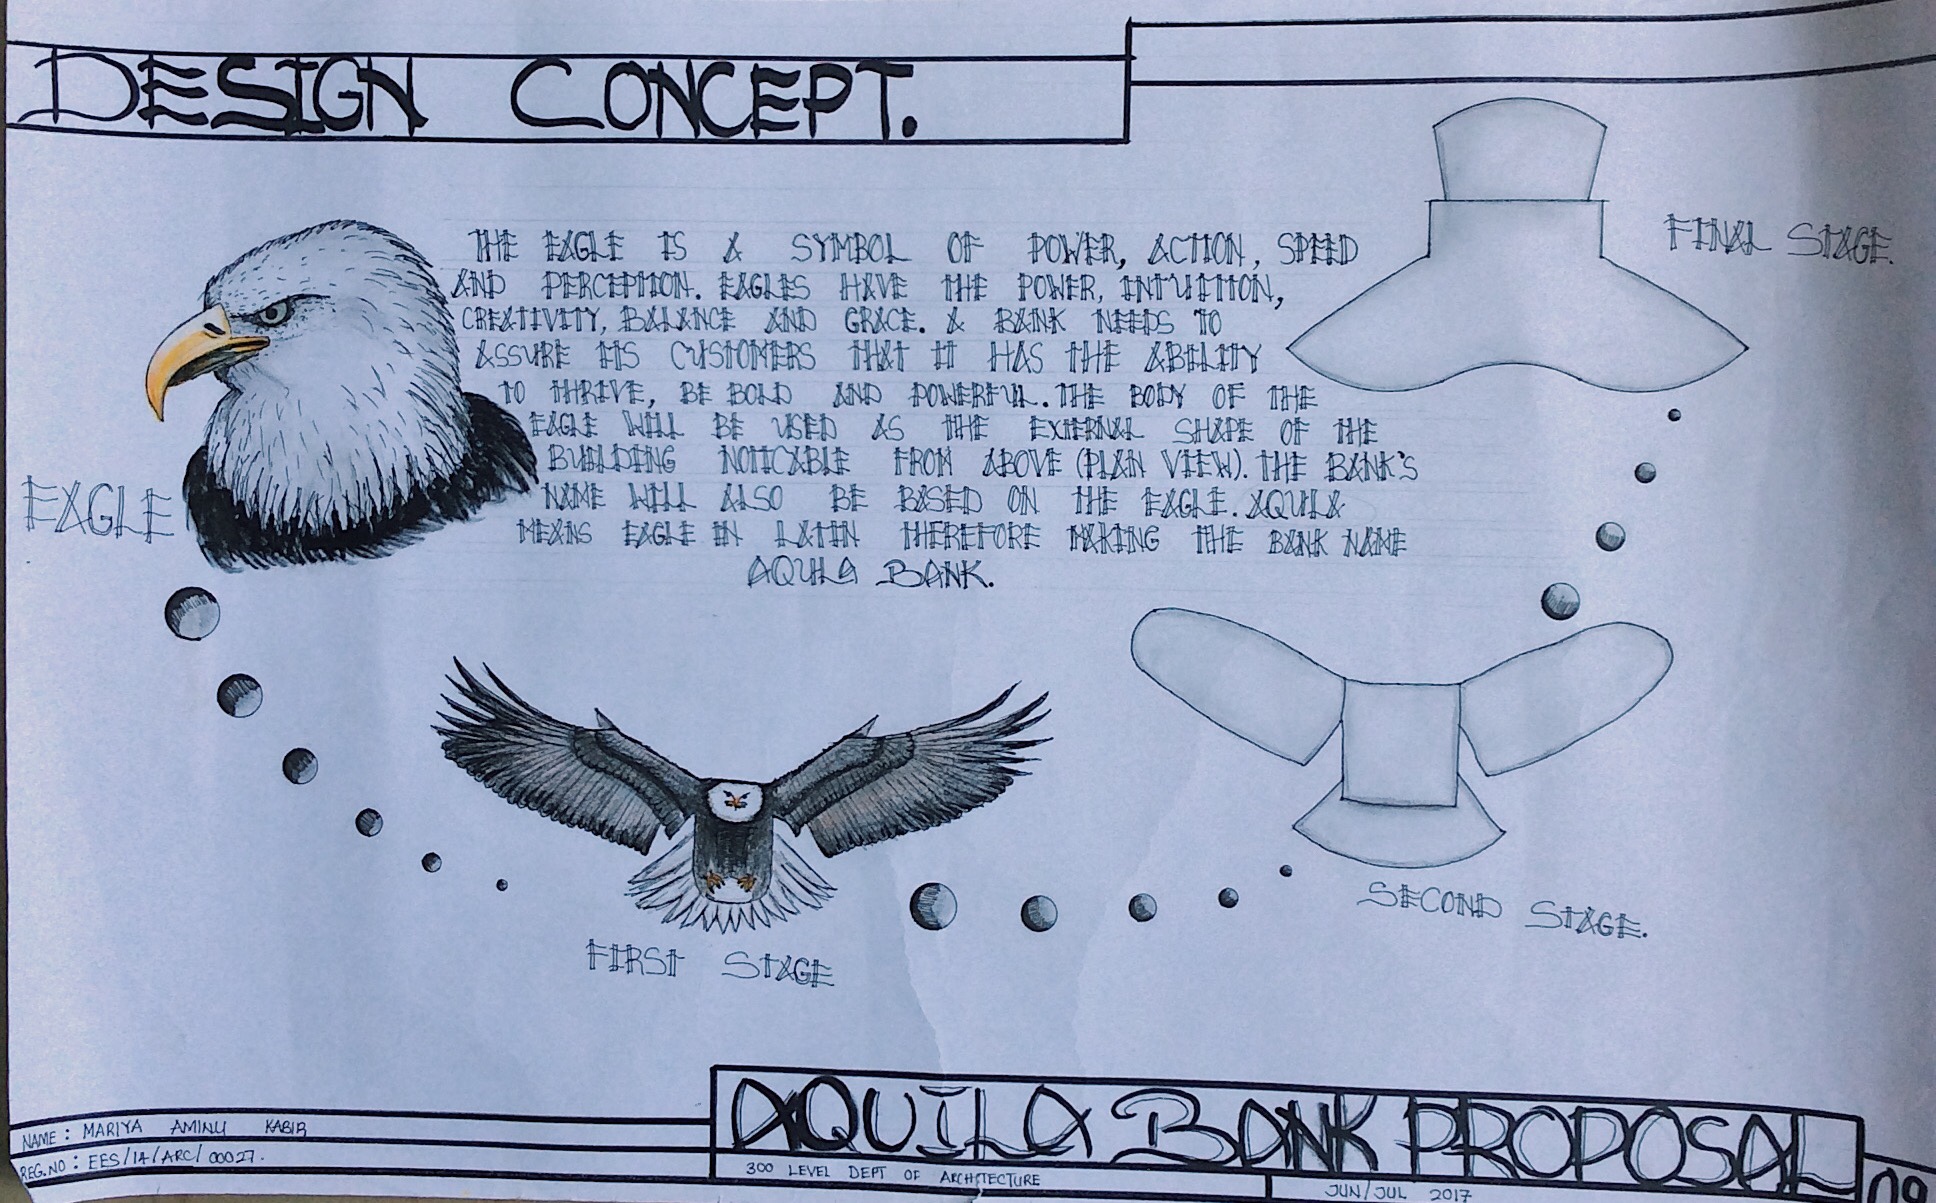
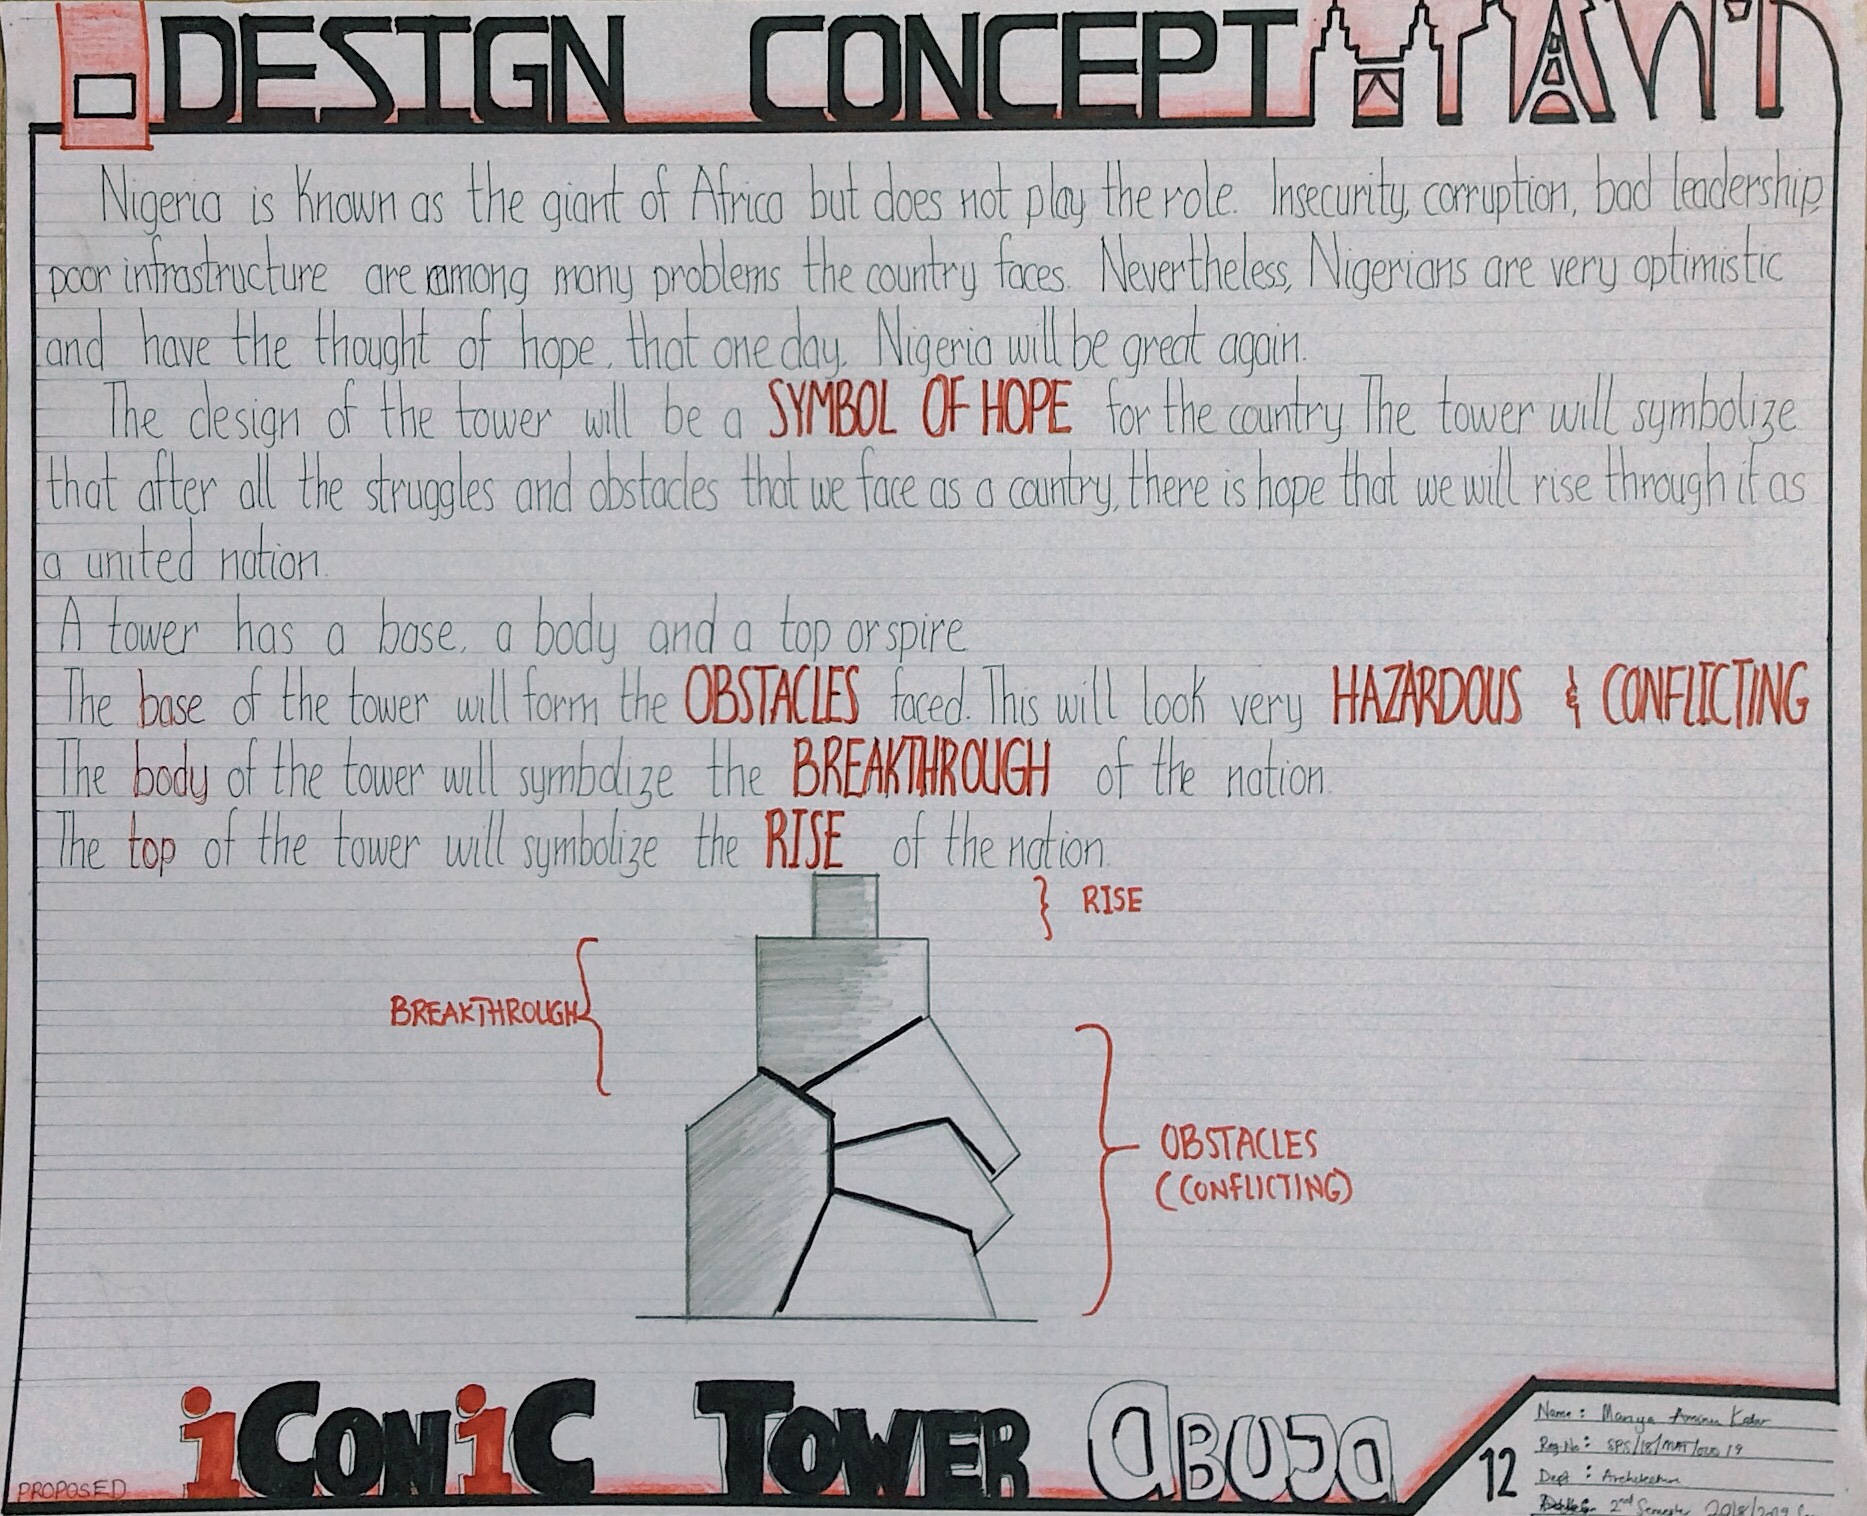
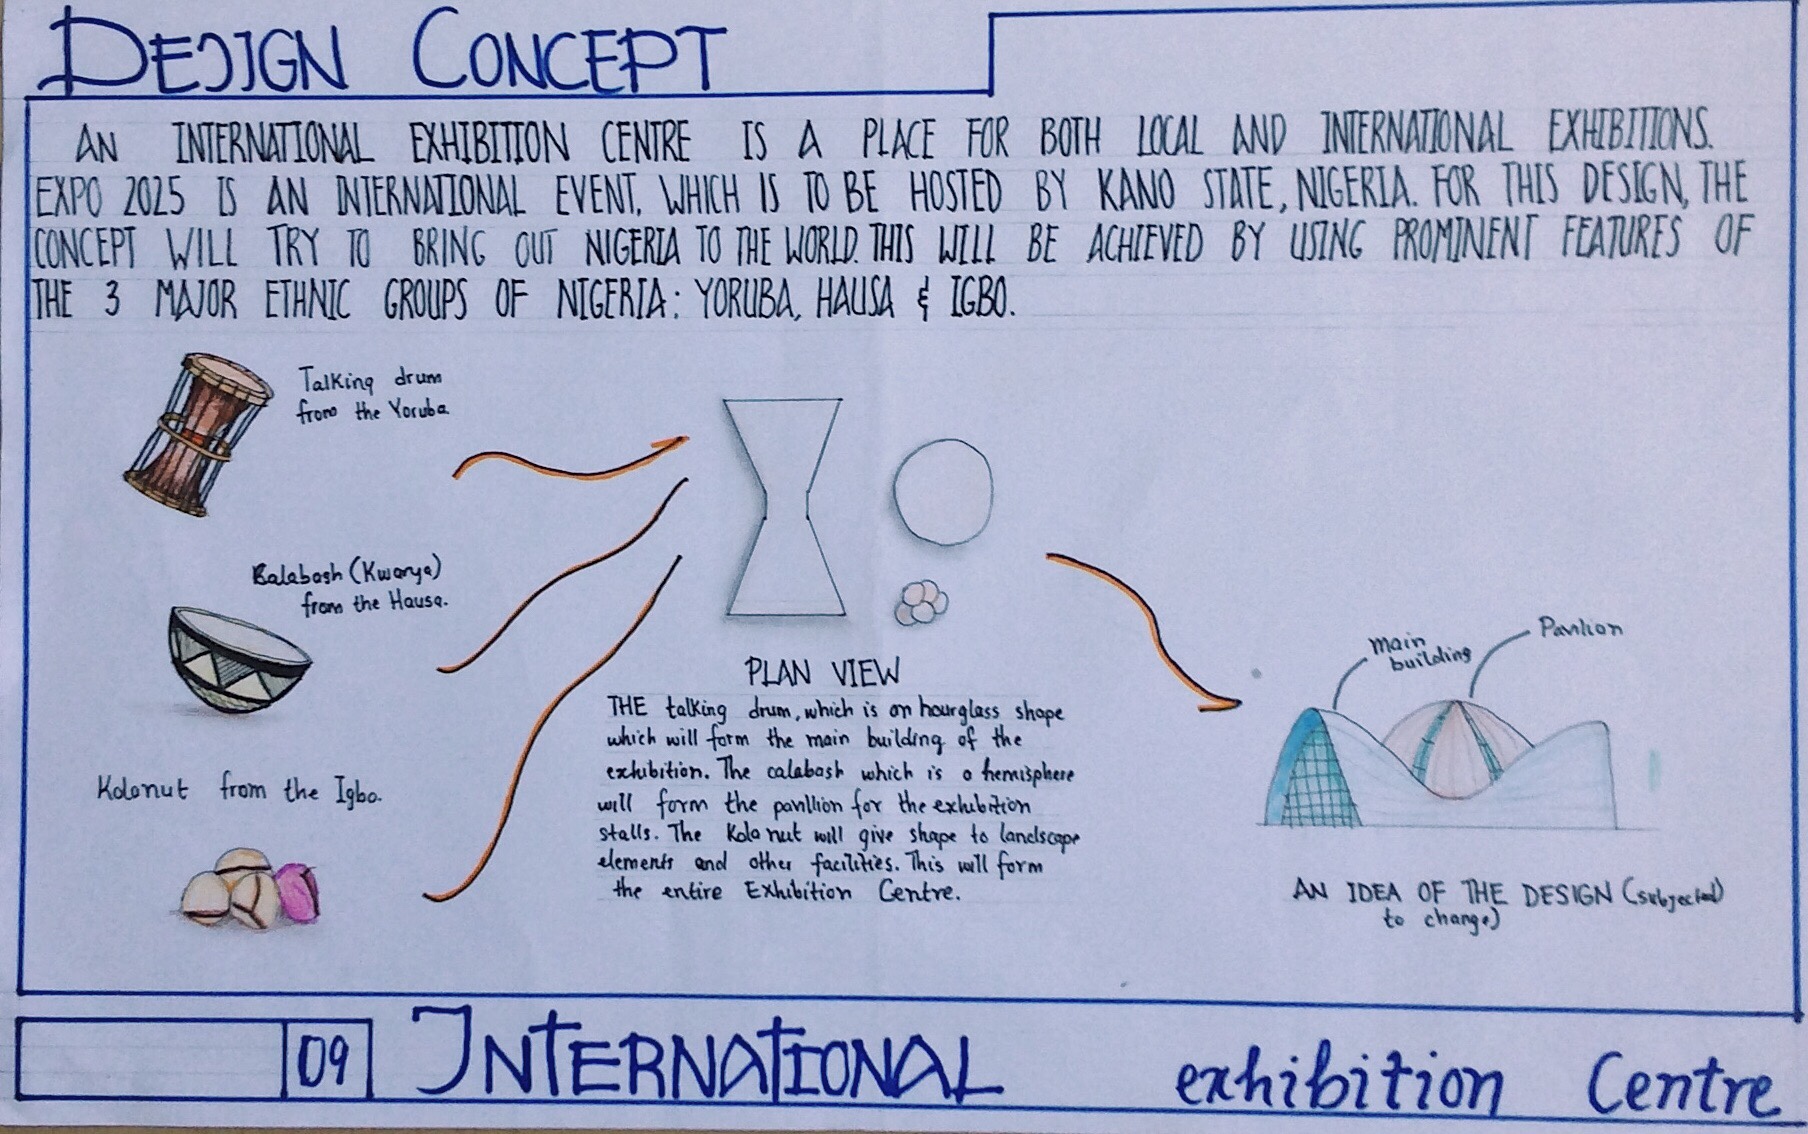
After choosing an approach, the next step is narrow done the details of the concept and how it relates to the design. Sketches will come into play as you need to translate the concept into a diagram which will reflect into the design. This will later be developed into floor plans, elevations, or any part of building that the concept adapted comes into play with. Below are some examples of design concept sheets in architecture:

Design Concept for a Bank
Design Concept for a Skyscraper
Design Concept for an International Exhibition Centre

Design, Education, Preliminary Design Stage Series

Episode 8: Space Analysis and Schedule of Accommodation

All spaces are designed to revolve around the human being. The design of spaces is derived from how the user interacts with his environment. The human body is a unique design on its own that works within a unique ratio and proportion, therefore, the design of the surrounding environment is inevitably planned to be functional and compatible with the user. Space analysis is a tool that helps architects assign measurements to proposed spaces in order to achieve functionality in design.

How are these measurements achieved?

Fig. 1 Basic Human Dimensions

These measurements are achieved by analyzing the space needed for basic and comfortable movement, the objects to be placed within the space, and how the user will interact with those objects. For example, in a bedroom, there will be movement from the entrance of the bedroom to the bed, closet/wardrobe, drawers, tables etc. There will also be movement from some objects to another, and movement caused by interacting with an object within the bedroom like using the closet, sitting at a table etc. Below is an example of some basic dimensions:

Fig. 2 Bedroom Dimensions
Fig.3 Furniture Dimensions

From these dimensions and the dimensions of furniture and fixtures, we are able to assign appropriate sizes to spaces in a building. All these dimensions and sizes are then later inputted into a document called Schedule of Accommodation.

A schedule of accommodation is a list of accommodation facilities and provisions required by the client or user of a building project. It is usually developed during the preliminary design stage by the architect. The preparation of a schedule of accommodation helps to determine the minimum space requirements for the building.

It may include:

  • Room reference number.
  • Room location (for example, building name / floor).
  • Room name.
  • Room type / description.
  • Room size (i.e. floor area, and sometimes dimensions, which may include height).
  • Number and type of occupants.
  • Relationships between rooms and groups of rooms.
  • Furniture, fixtures and equipment (FF&E) requirements.
  • Environmental conditions required (i.e. temperature range, humidity, air movement, acoustic conditions, lighting levels and so on).
  • Total areas.
  • Exclusions (such as circulation spaces).
Fig. 4 Bedroom Space Analysis

Fig. 4 shows the analysis of a bedroom space for one occupant. The minimum dimensions for a bedroom is 3m by 3.6m which is proven above using the basic spaces required for the user to interact with his/her space and the area of the furniture provided. These dimensions help in the planning of space more adequately.

Using these simple standards, the dimension of a space can easily be obtained by the architect. Thank you for reading and stay tuned!

Design, Education, Preliminary Design Stage Series

Episode 7: Bubble Diagrams and Functional Flowcharts

Bubble diagrams are freehand diagrams made during the preliminary design stage to help plan or zone spaces with similar functions. The bubble diagram is the first step made towards achieving a floor plan. The information from a bubble diagram helps plan out major functions in a building, spaces in the building, their relationships, and sometimes even circulation patterns.

A functional flowchart is also a freehand diagram which is drawn after the bubble diagram to generate main functions or spaces in the building, how they connect to each other and circulation routes in the building. This is like a rough sketch of a floor plan. A very common mistake made when dealing with functional flowcharts is that students usually generate the flowchart after they have completed the floor plan, while the flowchart is supposed to be done before the floor plan.

There are some similarities between a bubble diagram and a functional flowchart. A simple google image search on bubble diagrams, you would realize that the bubble diagrams and functional flowcharts are practically the same thing. However, architecture education sometimes differs from various parts of the world, therefore, we have bubble diagrams and functional flowcharts which are two different things. The ideal chain of generating a floor plan starts with a bubble diagram, then a functional flowchart, and finally a rough sketch of the floor plan.

How to do a Bubble Diagram

A bubble diagram is derived from the main zones/functions in a building. These zones/functions are obtained from case studies and literature review. Their positioning is however based on information from site analysis and site zoning. Fig. 1 shows an example of site for a residential design. In the first diagram, the site has been analyzed and discovered to have major sources of noise from the roads around the site. This resulted in the zoning of the site showing the proposed area for development in the second diagram. The third diagram shows how the bubble diagram has been developed within the proposed development area. The public zone and service zone is placed close to the most accessible part of the site, while the private zone is placed away from it. A buffer zone is also provided as a barrier from neighboring sites.

Fig. 1: How to derive a Bubble Diagram

The zones in the bubble diagram are derived through case studies and literature review. The main functions in a house include living areas, sleeping areas and supporting functions like cooking areas. These areas are grouped into public zones, private zones and services as shown below in fig 2.

Fig. 2: Spaces within Zones

How to do a Functional Flowchart

A functional flowchart comes after the bubble diagram. This represents how spaces are connected with one another. This usually gives an idea of how a floor plan would look like. In a residential design, the main spaces include the living room, dining room, kitchen, storage room, bedrooms and toilets. There might be other spaces like a foyer, laundry room, a study, etc. but it all depends on the nature of the design brief. Like a flowchart, these spaces are represented in a diagram with lines connecting them. The lines serve as circulation routes through the buildings.

Fig. 3: Bubble Diagram and Functional Flowchart

Zones and spaces in bubble diagrams and functional flow charts are peculiar to the nature of a project. It is important to be creative with your diagrams. Nice sketches or details can be added to help make the diagrams more appealing or explanatory. For example, in the design of a hospital, the bubble diagram was made to represent some sort of microorganism under a microscope (Fig. 4). In the design of a 5-star hotel, the functional flowchart was in 3D diagram showing how spaces interact on different levels (Fig. 5).

Fig. 4: Bubble Diagram for Hospital
Fig. 5: Functionality Sheet for 5-Star Hotel

The significance of bubble diagrams and functional flowchart cannot be over emphasized. It is important that they are done before any sketches of the floor plan are made. (NOTE: My designs were done before the establishing of Quif Studio. These current blog posts are written in line with research, my experience and through consultations. Any mistakes, omissions etc. that have been noticed in my designs, were made a few years ago. The sole purpose of sharing them is to give an idea of what each and every step should look like)

Design, Education, Preliminary Design Stage Series

Episode 6: Site Zoning

Zoning is the process of dividing land in a given area (cities, municipals, local government areas, etc.) into separate uses such as residential, commercial, industrial, etc. This is done to separate functions which are incompatible with one another and also give regulations in any urban growth and development plan. Areas of land are divided by appropriate authorities into zones within which various uses are permitted, which gives a guide for proper site selection.

However, an individual site can also comprise of various zones, which makes it easier in identifying where various functions should be placed due to certain factors. For example, the zoning below is for a proposed international exhibition centre which is located in Kano. The zoning shows neighbouring activities and how the affect the zoning of the site.

Fig. 1 Site Zoning for International Exhibition Centre

Site zoning and bubble diagrams work simultaneously. The zoning of a site affects the bubble diagram which gives the overall functionality of a building. For an independent site, there are two types of zonings. There is the zoning of the site, and zoning of the proposed building. The zoning of the site determines the zoning of the building, but they both share the same criteria for zoning. The criteria are as follows:
• Noise: Noise generation occurs both on and off a site. Noise from neighboring buildings, roads will shape the zoning within a site. For example, in the design of a hospital, patient wards and operating rooms which are quiet areas will be placed far away from sources of noise like roads, parking areas, etc. Machineries and heavy equipment like generators within a site will be zoned to prevent noise pollution to neighboring buildings.
• Accessibility: There is a natural hierarchy within the accessibility of spaces both within the site and within a building. The main access to a site will have a smooth chain of accessibility routes to all public spaces within a site and a building. Service areas within a site or building are not necessarily accessible to the public, therefore they will not be placed in a public area.
• Privacy: This a key factor especially in residential designs. Spaces such as bedrooms, family lounges are meant for the occupants which makes these spaces private. Privacy and accessibility are inversely proportionate, which simply means the more accessible a place is, the less private it is, and vice versa.
• Security: In the design of commercial and institutional buildings, security plays a vital role. Buildings like banks and prisons zone most of their spaces based on how secure the space needs to be. This makes the spaces to be strategically placed in such a manner that only selected people know its specific location and how to access it.

Examples of site zoning for a residential design (Fig. 2), a flour mill industry (Fig. 3), and a multipurpose skyscraper (Fig. 4) are shown below.

Fig. 2 Zoning for Residential Design
Fig 3. Zoning for Flour Mill Industry
Fig. 4 Zoning for Multipurpose Skyscraper

From my designs, you can notice how I went from doing a simple box form zoning (Fig. 2) to a more detailed zoning (Fig. 4). I hope you are able to understand site zoning a bit better. Thank you for reading and stay tuned!

(NOTE: My designs were done before the establishing of Quif Studio. These current blog posts are written in line with research, my experience and through consultations. Any mistakes, omissions etc. that have been noticed in my designs, were made a few years ago. The sole purpose of sharing them is to give you an idea of what each and every step should look like)

Design, Education, Preliminary Design Stage Series

Episode 4: Site Maps

Site maps are a series of maps that are provided to give information on the location of a proposed site. After the site selection has been completed, it is necessary to show the site location. There are two types of site maps which are:
• Site Location Map
• Site Vicinity Map

Site Location Map

This is a site map that shows the location of the proposed site. For the purpose of school, this is done in a blow-out format. That simply means that the maps start off from the map of a bigger location which might be a continent or a country, then you move on to the state where the site is located, then the local government area, then the site neighborhood, and finally, narrowing down to the site. For example, you start off from the map of Africa, then the map of Nigeria, then the map of Kano state, then to Gwale LGA, then to Sharada and finally the proposed site. The easiest way of drawing these maps is using Google Earth. It gives you an aerial view of any location which makes it easier for you to sketch it on paper.

Site Location Map
Site Location Map

Site Vicinity Map

From the name, this is a map showing the proposed site and its surroundings. This may also be known as Site Coverage or Site Inventory Map. This map is important because it helps you identify important features around your site which may later affect your decisions when it comes to site zoning. A vicinity map helps to point out accessibility routes, sources of noise, supporting facilities, etc. These factors help you communicate why some design decisions were made. Basically, a site vicinity map is a supporting step of other steps within the preliminary design steps like site selection criteria, site analysis or site zoning.

Site Inventory showing Proposed Site and Neighbouring Buildings
Site Vicinity Map showing existing buildings around the site

Site maps should be done with good graphics and should look as pleasing as possible. Always consult your lecturers before trying something new. Stay tuned for the next episode and thank you for reading!

(NOTE: My designs were done before the establishing of Quif Studio. These current blog posts are written in line with research, my experience and through consultations. Any mistakes, omissions etc. that have been noticed in my designs, were made a few years ago. The sole purpose of sharing them is to give you an idea of what each and every step should look like)

Design, Education, Preliminary Design Stage Series

Episode 1: Introduction

Welcome back to my blog guys!

Today marks the first episode of the preliminary design stage series, which will be talking about introduction or introductory sheet. For the purpose of this series, I will be choosing a residential design project to give a more practical and in depth explanation.

The introduction is the initial or first stage which kickstarts the further process of the design project. Every design project is given an introductory stir that paves the path for the successive stages in the project. It is important to make explanations and introductory sketches because it gives the first impression of what the content of the project is about. Imagine introducing yourself to a stranger for the first time. It gives them a slight impression of who you are which helps them decide on whether they want to know you better or not. As your first impression is important to other people, so is your attempt to introducing any project.

In architectural education, introductory sheets are a way of showing your jury panel and audience that you have the necessary information required for embarking on that project. It shows that you have done your research and gives you an upper hand at defending your work. The introductory sheet mainly consists the following:

  • Definition of terms:

The prominent keywords are to be defined. For example, “residential buildings” is my main keyword for this project.

  • Brief background:

A brief explanation of residential buildings or a house will be given. For example, spaces found in a house, their uses, etc. will be explained.

  • Aim and objectives of the project:

The aim of the project should also be stated and the objectives on how the aim will be achieved.

The following are some guidelines on how to properly do an introductory sheet:

  • Be short and crisp: Too much words makes the sheet unattractive. Try to be short and crisp. Explain the contents in simple grammar and vocabulary.
  • Be clear in what you write: The introduction must be written in the most simple but attractive manner. What you pen down should be clear and easy to understand. If the first part is complicated, it will reduce the interest of readers to go through the preliminary write-up of the design project.
  • Make good and elaborate sketches: It is important to make nice sketches in order to make your idea of the design clear to the readers. It helps build interest and it makes it easier for you to sell your idea to the readers and draw more of their attention.
  • Make your writing legible: Your writing should be neat, legible, and big enough for your jury to read from a distance. It is advisable you use capital letters. Make guidelines for the text, it makes it more appealing and organized.

Some part of the introduction goes hand in hand with literature review and case studies which will be discussed in the next post. Do you have any tips you would like to share? Feel free to share them in the comment section. Thank you for reading and stay tuned!

Design, Education, Preliminary Design Stage Series

Preliminary Design Stage Series

[crowdsignal poll=0]

Welcome back to my blog guys!

Welcome to the launch of a new series called the Preliminary Design Stage Series. I know from the title, you might be thinking “what is going on here?“. Well today, I am officially launching this series for the sole purpose of explaining what the entire preliminary design stage entails. Throughout the course of the series, I will be talking about each preliminary step taken before any architectural design.

From my previous post, which was talking about The Most Neglected Steps in Design, I pointed out that the most neglected steps are mainly from the preliminary stage which usually end up having an adverse effect on the overall design. This series is to help guide anyone in the architectural world (both in training and in practice) on what the steps are, their importance, and how to do them properly.

What is Preliminary Design Stage?

From the word preliminary, this is a stage in design that is done before the actual 2D or 3D architectural drawings. The stage involves gathering information of the site, its surroundings and the building type to be built or designed, and how that information is used in producing a functional design that will satisfy the users and fit perfectly into the environment. In a more detailed list below, these are the items that fall under the preliminary stage:

  1. Introduction
  2. Case studies and literature review
  3. Site selection criteria
  4. Site maps (site location map, vicinity map, etc)
  5. Site analysis
  6. Site zoning
  7. Space analysis
  8. Bubble diagrams
  9. Functional flow charts
  10. Schedule of accommodation
  11. Design concept

Depending on the project given, you might end up having a wider range of steps. For example, there might be cases where you are including sustainability or energy solutions to your design; sheets or presentations will be required on those issues which fall under the preliminary steps. In some cases, you are required to give an explanation of your building system, the materials and construction. This is also part of the steps. I only captured these 11 steps because they are the basic ones, but some of them are so wide and have a lot of categories under them as well.

Stay tuned for this series and comment down below what your expectations are. If you are a student, tell us what your favourite step is, what your least favourite step is, where you think you are lacking the most, etc. I would really appreciate your feedback. You can also email me with any suggestions from my Contact page. This series will also run through Instagram so make sure you check out our page from the links below.

Thank you for reading and stay safe!